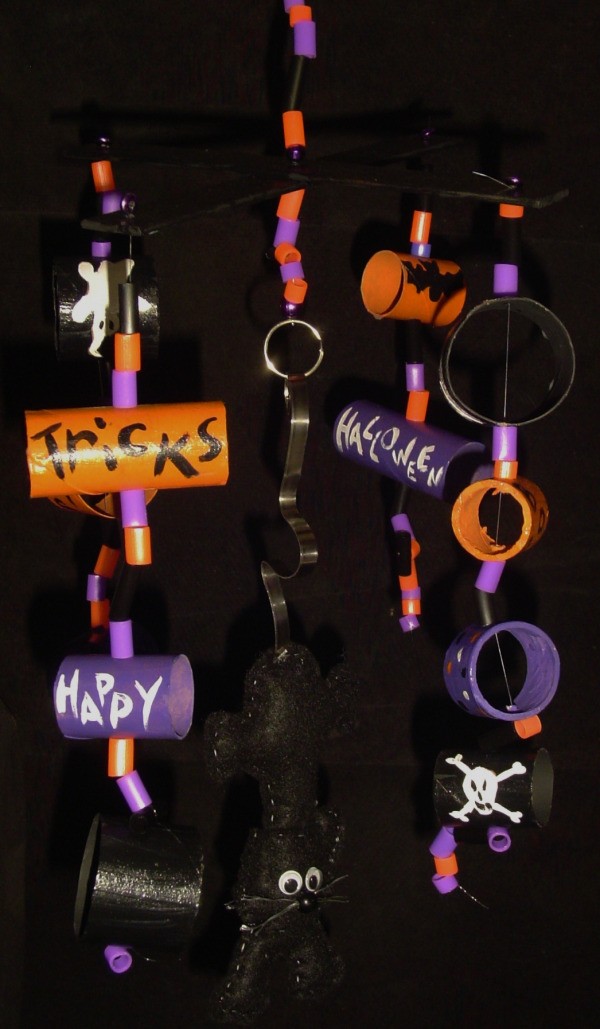
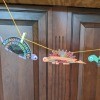
Send out Halloween greetings by way of a mobile. Hang it where it can catch a breeze and it will turn out wishes for all! It's a great way to recycle those cardboard tubes and felt scraps. Kids will have fun making their own Halloween creation. Just a few stitches and some painting will have this cat spinning in no time!
Approximate Time: Time will vary
Advertisement
Supplies:
2 paint stick stirrers
paints
cardboard tubes
fishing line or string
beads
small amount of stuffing
wire or pipe cleaners
black bead- wood or plastic
2 wiggle eyes
Instructions:
To make the base for the mobile to hang from, cut off the handle ends of two paint sticks. Some other things to use can be pieces from a yardstick, ruler, jumbo craft sticks, or even strips from very heavy cardboard. Glue them together in the center so they form an "X". Allow to dry.
Poke a hole at each of the 4 ends, about an inch in. Poke a hole through the center. I used a bead reamer to make my holes. Paint sticks are made of soft wood so it went through quite easily.
Paint your "X" black.
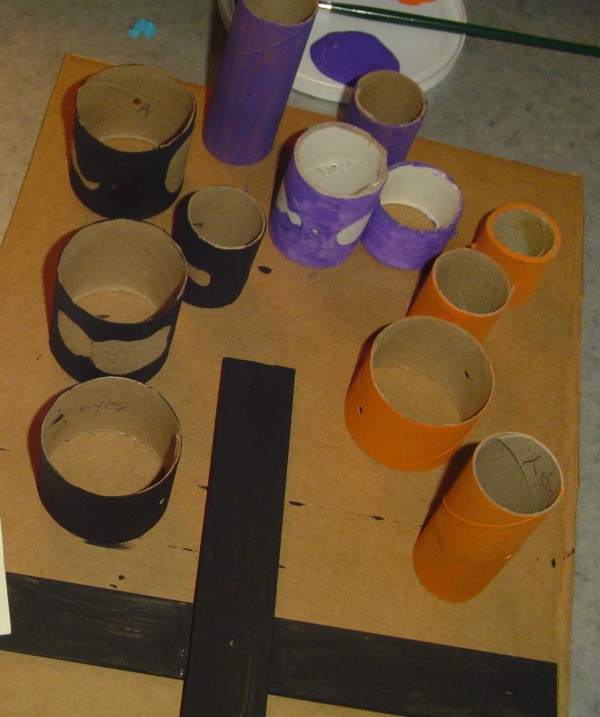
To make the cardboard tube pictures, you will need to cut sizes from your tubes. Mobiles need to hang evenly so the easiest way to achieve that is to use the same amount and size of tube pieces to hang from all 4 sticks. If one end seems to hang unevenly, add or remove beads to adjust.
Decide on how many tubes you want to hang and cut them from your long tubes. The ones that paper towels come on are a good size and easy to cut.
Advertisement
Poke a hole through both sides of each, making sure they are directly across from each other. The string will go through these holes when you hang them.
Paint all the tube pieces and pictures or words on them. Black, orange, green, and purple are good Halloween colors to use. You can even glue on stickers or cut outs, if desired. Allow to dry.
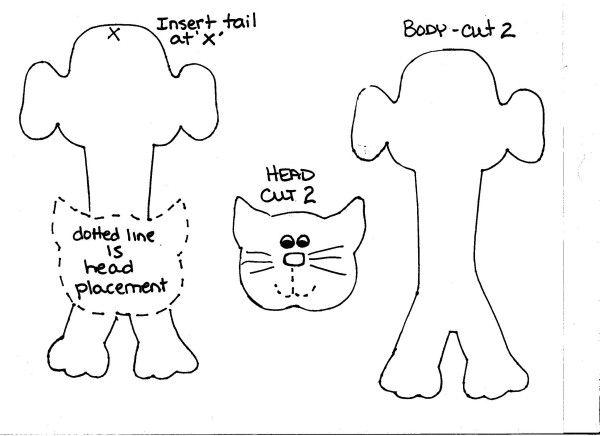
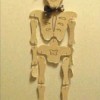
To make the cat, decide on what you will use for the tail and curl or bend it. Make it at least 6" long after curling. Bend one end into a hook.
Advertisement
Cut out the pattern cat pieces.
Take the 2 body pieces and sew together, leaving the bottom open. Stuff lightly and insert the tail. Sew bottom closed.
Referring to the photo, place body between both head pieces and sew closed, stitching through body at top and bottom of head.
Glue on google eyes.
Snip a black wood or plastic bead in half. Glue threads on the inside of one and then glue bead under eyes for nose.
To assemble the mobile, cut 5 long pieces of fishing line, string or thin cording. You can cut off excess later if they are too long. Make a loop and knot closed at an end of one line. I slid a key ring inside mine to hang it from but just tying a loop will work fine.
Slide on a bead and insert the line through the center hole. Slide another bead onto line and knot so it locks the "X" in between the 2 beads. Slide some more beads on and make a loop. Knot. This is the loop you will hang cat from by it's tail.
Advertisement
Take another piece of line and tie a bead onto one end. Knot well to secure. Put the line through a hole and slide another bead on as you did for the center. Alternate beads and cardboard tubes and thread these onto the line. End with a bead and knot it so it keeps everything above it on. Do the same on all sides.