social

Yarn Pumpkin-Shaped Decoration


Silver Answer Medal for All Time! 440 Answers

The finished pumpkin.
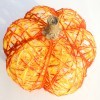
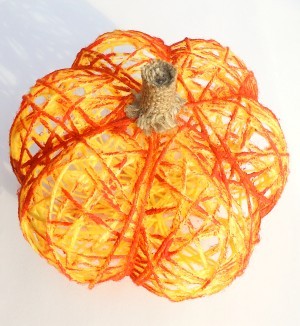
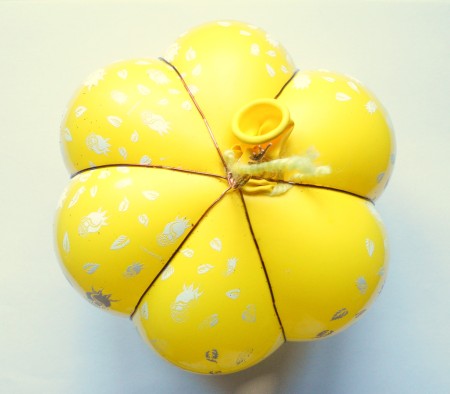
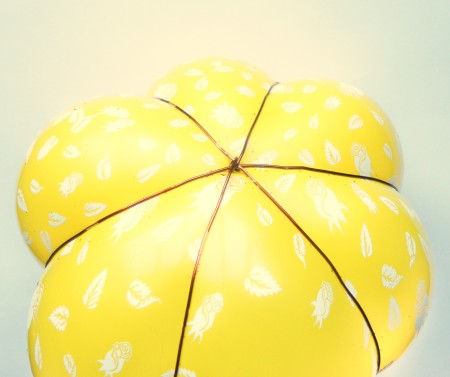
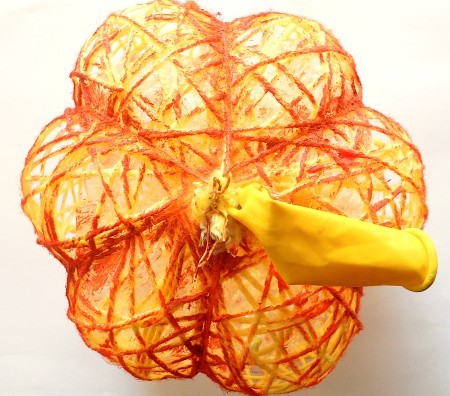
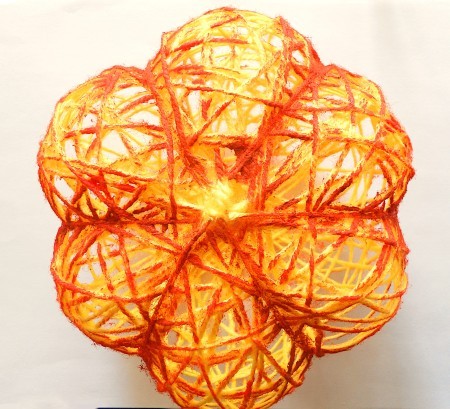
Many people know how to make mache pumpkins out of paper, glue and balloon. Also, some people use thread, glue and a balloon to make pumpkins, but which result in a spherical shape, and, accordingly, very vaguely resemble pumpkins. I got the idea to combine these two methods and make a pumpkin out of yarn and glue with a real pumpkin shape. It's strange that no one has come up with this idea yet. I also want to share with you an idea of how to make such a pumpkin as quickly as possible.

Advertisement

I am delighted with the result. You can also use such pumpkin as a lampshade.

Total Time: 25 Minutes

Supplies:

Steps:

  1. Blow the balloon up to desired size and tie it up. Do not inflate the balloon as large as possible.
  2. A blown up balloon.
     
  3. Cut a few pieces of wire slightly larger than the circumference of the inflated balloon. The number of wires depends on the diameter of your future pumpkin and, accordingly, the number of sectors.
    You can add the wires one by one, or you can connect all them in the middle together (twisting once). Bend the wire around the inflated balloon and twist the ends so that the length of the formed wire circle is slightly less than the circumference of the inflated balloon.
    Twist the ends of the wire carefully to avoid damaging the balloon. Since I used a wire from a very damaged transformer, the coating began to crumble, but this will not affect the pumpkin, since we will still wrap everything with foil.
    As a result, you will get sectors like a real pumpkin. To adjust the width of the sectors, carefully move the balloon inside the wire frame. But the sectors do not have to be exactly the same, since in nature you rarely find pumpkins with absolutely the same sectors.
  4. Rubber bands on a balloon to create a pumpkin shape.
     
    Rubber bands on a balloon to create a pumpkin shape.
     
    Advertisement

  5. Wrap with cling film in one layer around the balloon.
  6. Covering the pumpkin shape with saran wrap.
     
  7. Wrap the yarn once between sectors to tighten the film. Continue wrapping the yarn around the balloon in different directions. Do not pull the yarn tight. Avoid hitting the yarn in the same place several times. At the end, wrap tightly 2 times between sectors to tighten the already wrapped yarn.
    Cut yarn and tie the end.
  8. Covering the pumpkin shape with yarn.
     
  9. Of course, you can use a solution of PVA glue with water to fix the yarn, but then you have to wait a long time for the glue to dry well. To speed up the fixation of the yarn, I first applied super glue to the yarn turns between the sectors - these are the most important areas that give our pumpkin the shape of a real pumpkin. Wait a couple of minutes for the glue to dry and the yarn to harden.
    Then spray the yarn with hairspray, dampening the yarn well.
    Dry the yarn well with a hair dryer (this will be pretty quick).
  10. Covering the pumpkin shape with yarn.
     
    Advertisement

  11. Apply some orange paint to the surface of the yarn. Apply more paint between the sectors to visually highlight the sectors. Do not add water to paint.
    Use a hair dryer to dry the paint (this will be very quick).
  12. Adding orange color to the yarn.
     
  13. Carefully cut the yarn at the top and pull out the balloon. You can use the same balloon to make another pumpkin.
    Untwist the wires carefully and pull them out.
    Remove the film.
  14. Adding orange color to the yarn.
     
    Adding orange color to the yarn.
     
  15. Cut a strip from the burlap to make a piece of stem.
    Pull a few threads from one edge.
    Roll the strip and fix with hot glue.
  16. A small piece of burlap.
     
    Forming the burlap into a stem shape.
     
    Advertisement

  17. Hot glue the burlap stem with frayed end to the pumpkin.
    I really like the contrast of the burlap with the brightly painted yarn.
  18. Adding the stem to the pumpkin.
     

Add your voice! Click below to comment. ThriftyFun is powered by your wisdom!

 
October 22, 20210 found this helpful

Great idea!
I voted, but votes for this contender do not count.


Silver Post Medal for All Time! 267 Posts
October 22, 20210 found this helpful

We are looking into this glitch and hope to have it fixed very soon. Comments and shares are other ways we help our editors choose the winners so be sure to leave comments on any of the Halloween contest entries you would like to see win.


Silver Answer Medal for All Time! 440 Answers
October 22, 20210 found this helpful

Thank you!

 
October 24, 20210 found this helpful

Pretty! Maybe a string of fairy lights would work well with it.


Silver Answer Medal for All Time! 440 Answers
October 25, 20210 found this helpful

Thanks! :)
I agree! A string of fairy lights will work great with it, especially in evening.

 
December 25, 20230 found this helpful

I can't get enough of this post.


Add your voice! Click below to comment. ThriftyFun is powered by your wisdom!

 
In This Page
Categories
Decorations CraftsOctober 20, 2021
Pages
More
💘
Valentine's Ideas!
🎂
Birthday Ideas!
🍀
St. Patrick's Ideas!
Instagram
Sub-Categories
AdviceBooksCandyCostumesCraftsDecorationsGamesGhost StoriesHaunted HouseHistoryJokesLinksMake UpMiscellaneousPartiesPartiesPhotosPumpkin CarvingRecipesSafetyTipsTreats
Published by ThriftyFun.
Desktop Page | View Mobile
Disclaimer | Privacy Policy | Contact Us
Generated 2024-02-01 05:47:09 in 2 secs. ⛅️️
© 1997-2024 by Cumuli, Inc. All Rights Reserved.
https://www.myfrugalhalloween.com/Yarn-Pumpkin-Shaped-Decoration.html