social

Halloween Plate

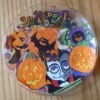
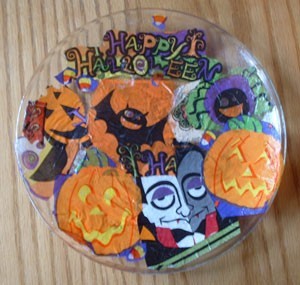
This plate is both inexpensive and easy to make. My 9 year old daughter made this one. Here is what you need:

Materials

  • 1 clear glass dessert plate (easily found a dollar store)
  • Advertisement

  • themed paper napkins (also found at a dollar store)
  • 1 foam paintbrush
  • Mod Podge (found at craft stores)
  • scissors

Instructions

  1. Cover your work area with newspaper.
  2. Be sure you wash and dry the plate thoroughly before starting.
  3. Use scissors to cut out pictures from the napkins.
  4. Place the plate face down on the newspaper. With the foam brush, put a thin layer of glue on the plate. Place the napkin pictures on top of the glue. Be sure to pay attention to which side of the picture you are placing into the glue. You want to be sure you are placing the pictures right side down on the back of the plate, since you will be looking through the plate at the pictures once it is finished. Continue putting the pictures on the plate until you are satisfied with the appearance.
  5. Advertisement

  6. Use the foam brush to cover the entire back of the plate with more Mod Podge, sealing the pictures in place. Seal with 2-3 more coats of Mod Podge, allowing to dry the amount of time suggested on the bottle in between coats.
  7. Once the plate is dry, you can turn it over and even eat off of it. Handwash only.
  8. By Michele from East Bethel, MN

Halloween decorated plate.
 

Add your voice! Click below to comment. ThriftyFun is powered by your wisdom!

 
October 16, 20070 found this helpful

What a great idea - using napkins! that's a new one for me and i've seen about every crafting show there is! Easy enough to do with the kids and definitely in my price range too!!


Bronze Craft Medal for All Time! 67 Crafts
October 16, 20070 found this helpful

this is so adorable.

 
By (Guest Post)
October 17, 20070 found this helpful

Doesn't the paper get soggy from the mod podge and rip? I had a problem with magazine clippings that I was trying to decoupage onto tiles.

Advertisement

Any suggestions. The plate is adorable. You could do this for many different holiday plates.

 
By Michele (Guest Post)
October 17, 20070 found this helpful

Hi~ It didn't get soggy when we made it. We put a layer of glue on the plate first, before placing the napkin pieces on it. Once they are all on, just gently brush the mod podge glue over the paper napkins. We used foam brushes as opposed to bristle brushes also. Thanks for looking at it and the compliment! I thought a cute one for Santa may be in order! ~Michele

 
By Debra Frick (Guest Post)
October 18, 20070 found this helpful

Thank you Thank you for posting these directions! At a craft show last year I bought a large platter that had a Denver Bronco's Theme. I noticed that the platter was identical to a platter that you could buy at Walmart and that the fabric used was also in their fabric dept. I just did not know how they stuck the fabric to the plate. My son loved the platter being that he is a big Bronco's fan and said he would have loved some little plates to go with the platter since I added a blue bowl to go with it for chips and dips.

Advertisement

So now he will have his little plates and the son in law in California that loves the Steelers will get a set too for Christmas. Again Thank you for the directions and Happy Crafting!
Deb

 
October 27, 20130 found this helpful

Beautiful! I have to try this!


Add your voice! Click below to comment. ThriftyFun is powered by your wisdom!

 
In This Page
Categories
Crafts DecoupageOctober 16, 2007
Pages
More
🍀
St. Patrick's Ideas!
🎂
Birthday Ideas!
💘
Valentine's Ideas!
Instagram
Sub-Categories
AdviceBooksCandyCostumesCraftsDecorationsGamesGhost StoriesHaunted HouseHistoryJokesLinksMake UpMiscellaneousPartiesPartiesPhotosPumpkin CarvingRecipesSafetyTipsTreats
Published by ThriftyFun.
Desktop Page | View Mobile
Disclaimer | Privacy Policy | Contact Us
Generated 2024-02-03 12:41:38 in 2 secs. ⛅️️
© 1997-2024 by Cumuli, Inc. All Rights Reserved.
https://www.myfrugalhalloween.com/tf72222073.tip.html